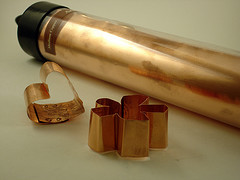
Three Ways to Make Your Own Cookie Cutters
 Cookie cutters are great tools to use with polymer clay. They're inexpensive and come in lots of great shapes. But occasionally you find yourself needing a special shape or size that's not available. While you can buy cookie cutter kits
, here are three alternatives for making your own cookie cutters with supplies you probably have around the house.
- Foil Pan Cookie Cutters: Check out wikiHow for aluminum pan cookie cutter instructions. Lesley Shepherd of the About.com Miniatures channel uses foil pans for her mini cookie cutters too, but her instructions also include tips for making custom handles from polymer clay. The nice thing about foil pans is that they cut easily with scissors. The downside is that the cookie cutters aren't very strong — though they'll be a little more durable if you follow Lesley's instructions and fold your foil strips in half first.
- Metal Ribbon Cookie Cutters: Peggy Weaver of What's Cooking America has instructions for making cookie cutters with copper ribbon. You can also use embossing metal cut to size — I used medium weight embossing copper from the craft store (a 9" × 12" roll cost about $7). I was still able to use plain scissors to cut these, but the copper makes the cutters a little more durable than the foil pan cutters.
- Cookie Tin Cookie Cutters: If you want something even sturdier, try ReadyMade's instructions for creating cookie cutters from recycled cookie tin lids. Basic scissors probably won't work here (the article recommends tin snips), but the end result should be much stronger.
And here are a few extra tips for success:
- Use a good double-edged ruler to measure and mark the lines for cutting out your cookie cutters. It's important to make sure the cutter's the same width throughout.
- Don't bend the angles too much as you're creating the cookie cutter. I over-bent my first heart shape and ended up tearing the foil.
- I liked the wikiHow suggestion for using staples to close the cookie cutter. Super glue also worked well for me on the foil cutters.
- Experiment first with simple shapes, and work up from there. Needle-nose pliers are nice for creating sharp angles; pens are good for making curves.
- Heed the sites' warnings: gloves are a really good idea!
Finally, check out these sites for more cookie cutter fun:
- Juggling Frogs has tips for making a bulk cookie cutter. While she's using tuna cans, you could use custom-shaped cookie cutters instead. Handy anytime you're doing mass-production work!
- And Tipnut has a great collection of cookie cutter resources, including fun project ideas like making cookie cutter soaps or crayons.
Do you have any fun suggestions for making or using cookie cutters? I'd love to hear them — just leave a comment!


Comments
I've made my own cutters out of an aluminum can. (be careful they are reaaly sharp) I simply tape the edges of the cutter together with scotch tape. It's thin enough to glide through the polymer clay and if it starts peeling, I remove the old piece and put on a new piece. :)
Posted by: tejae | March 27, 2009 11:43 AM
Thanks for the tip, Tejae -- that's a great way to recycle too!
Posted by: Angela Mabray | March 28, 2009 3:29 PM
i tried to make a black & white striped bead but the black color leached into the white & the white looked gray. do u know how to stop this & keep the white looking white after baking? thanx
meb333@gmail.com
Posted by: Anonymous | July 19, 2009 9:36 AM
Anonymous: You might take a look at the Canes page on Glass Attic. It gives suggestions for how to keep colors from bleeding. A translucent sheet between them & baking immediately are two tips I noticed right off... but I'm sure you'll find more good suggestions if you read through it.
Posted by: Angela Mabray | July 21, 2009 11:56 AM